How to See the Milky Way in Pennsylvania
A detailed insight to how I was able to capture surreal pictures of the milky way in Pennsylvania on my iPhone.
TRIP REPORTS
Zachary Barckholtz
8/26/2024
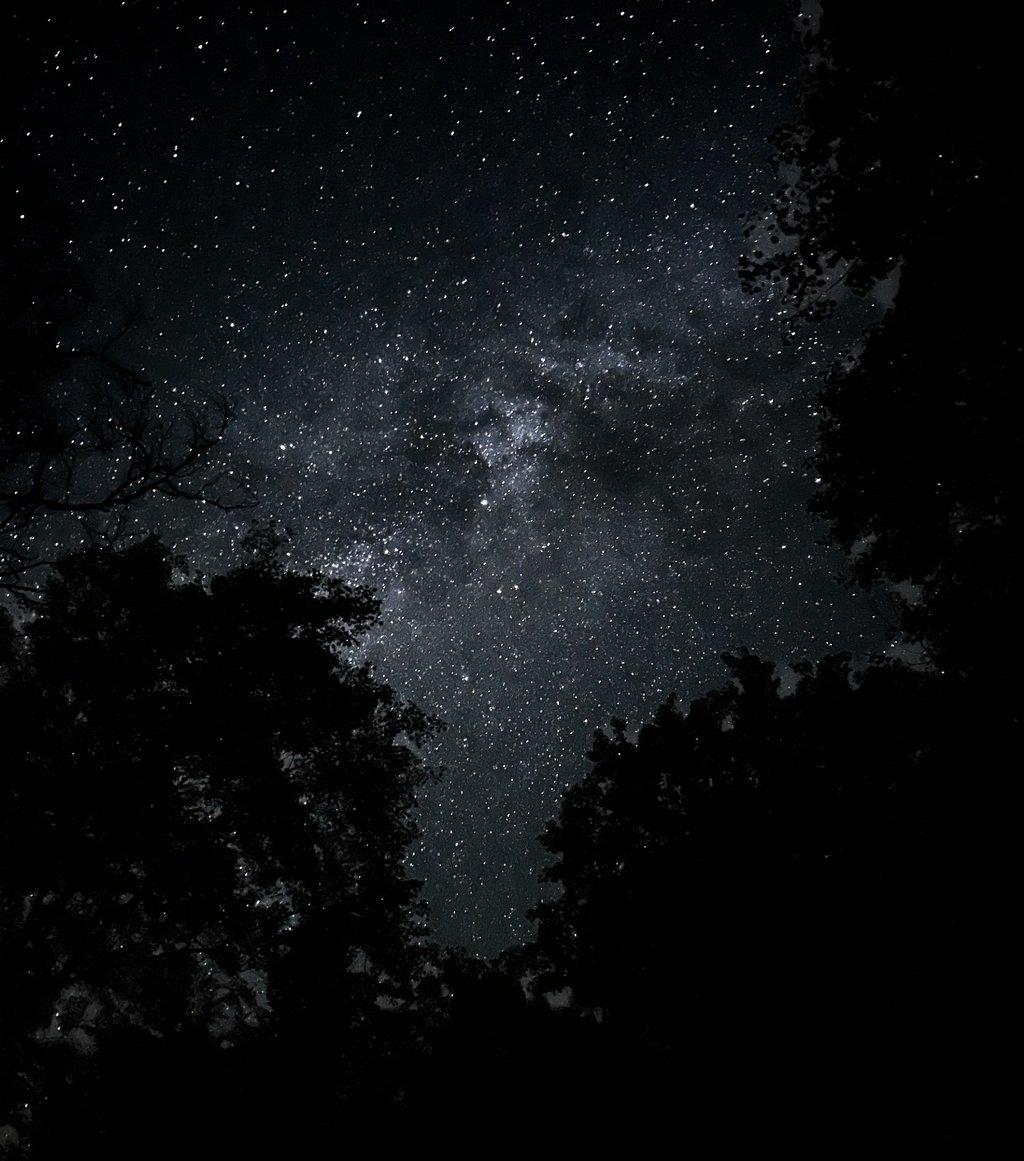
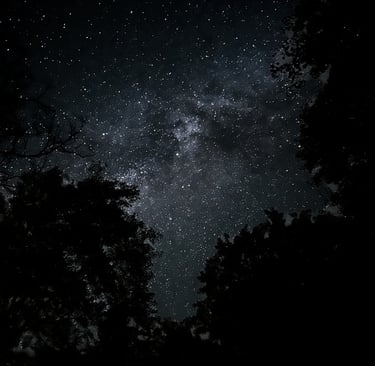
Seeing the Milky Way is one of the coolest experiences someone can have. The thousands of stars that surround it and the rip that it tears through the night sky is truly unreal. The sad part is many people go their whole life without seeing the Milky Way. It has always been something that has interested me, and I finally was able to accomplish seeing it myself. In this quick article, I will teach you how to see the Milky Way
Finding a Location to see the Milky Way
The first step to seeing the Milky Way is to head over to lightpollutionmap.info and find where you live. Reading this map is simple, warmer colors such as red and orange mean lots of light pollution, and cooler colors like blue mean less light pollution. Ideally, you want to find a location in dark blue or grayish black. These will often be State Forests, National Parks, or Dark Sky Sites.
Once you find a location near you that you’ve set your heart on, it’s time to find out where you’re going to park or set up camp for the night. If backpacking like I did, check Alltrails or other maps for good trails. If you park your car, go on a map of some sort and look for a clearing or opening that you can park nearby. You want to be able to see the entirety of the sky. If you can’t find an opening or clearing, try to at least find an area that you will be able to face South as this is where the Milky Way will be in the sky.
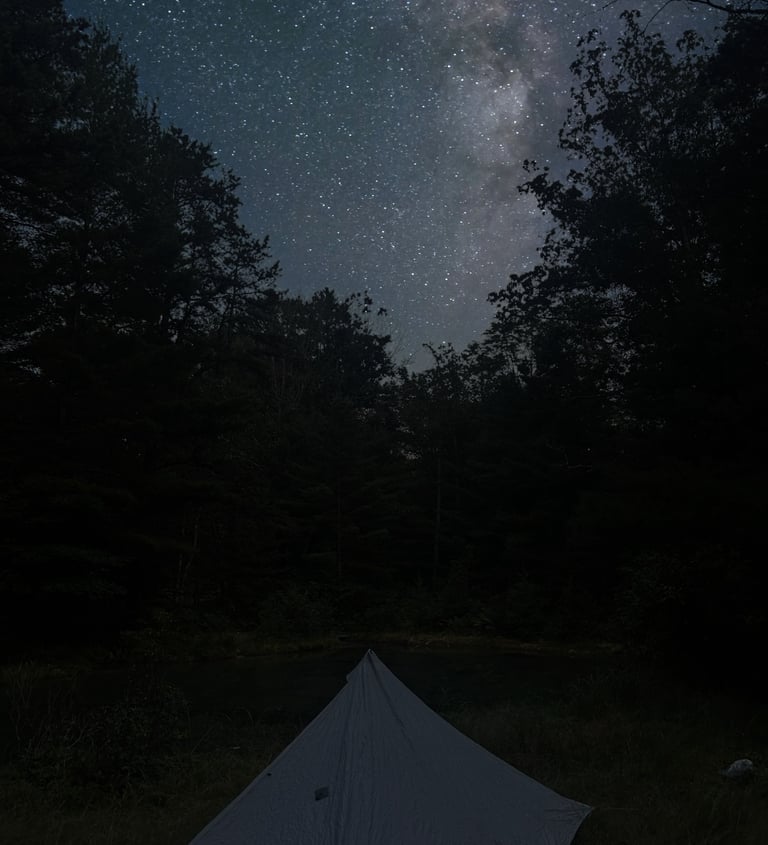
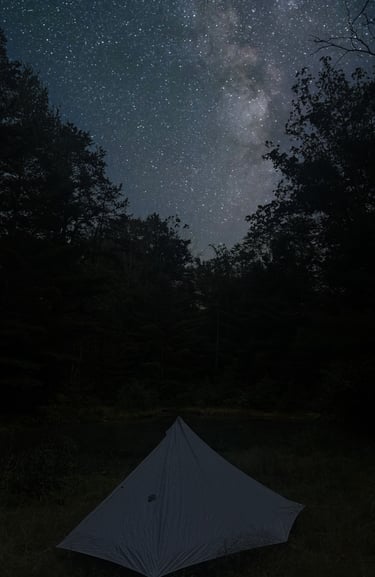
In my case, I go to college in Williamsport Pennsylvania and opted to hike a trail in Susquehannock State Forest and pitched a tent for the night. Unfortunately, this left me in the trees with limited options on how to shoot the Milky Way with my camera.
Timing is Everything
Once you have your location set, there’s still several aspects that impact your ability to see the Milky Way.
Firstly, the time of the year is very important. The Milky Way season is from April to September, with the peak being in June to August. I was able to make it out towards the end of peak season and captured phenomenal pictures.
Secondly, once you’re outside of human light pollution, there is another light source you must worry about. The moon. A Lunar Calendar here is going to be your best friend. The one I linked shows you all the moon phase, what date they’re happening on, and what time it will peak out. It’s important to go during a new moon, or around that window. I didn’t go on a new moon, but I did go the day before a new moon, and I couldn’t even find it.
Once you have your location and moon-free dates picked up, there’s one last thing you need. Clear skies. A cloudy night will ruin your night, and this is why I highly recommend either having multiple dates or picking the closest good location so you can either cancel last minute or spontaneously go if the weather lines up.
Now that you’re in your location on a clear moon-free night, it’s important that either once you wake up or get off your phone, to let your eyes adjust. The best time to view the Milky Way is from 12am to 5am. Give your eyes 15 to 20 minutes to adjust to the darkness.
A Quick Guide to Taking Pictures
You’ve now seen the Milky Way, so everything is done right? No, of course you want to share pictures with your friends. The name of the game here is to have your phone or camera still for a long time. You can pick up a cheap phone tripod on Amazon here.
Once you have your phone or camera on a tripod, the next step is to manually change the settings. On iPhone (what I shot these pictures on), the setting to look out for is exposure time. Your phone will handle the rest. The exposure time should automatically be set to three seconds. This isn’t enough. You want to tap on that little yellow button and slide it to either 10 seconds or 30 seconds. Beware that in 30 seconds you may end up with what are known as star trails. This is when your shutter has been open too long to the point where stars have moved in the sky leaving a trail. To keep your phone extra still, set a 3 or 5 second timer after you click the button so the tripod can settle.
On a digital camera, look up how to manually change your settings. You want to have a shutter speed of around 8-10 seconds, an ISO of either 3200 or 6400 and the lowest aperture. There’s plenty of resources online that I highly recommend checking out, as I am not a digital camera expert.
Congratulations, You’ve Now Seen the Milky Way!
Pat yourself on the back and make sure to brag to all your friends, as it is something special. Thank you so much for reading my article, and make sure to follow me on my socials linked into the little icons. Good luck with your Milky Way viewing!